
Growing a mango tree from a seed can be a rewarding and exciting journey, allowing you to witness the miracle of nature unfold right in your own home. Imagine plucking ripe, delicious mangos from a tree you nurtured from a tiny seed! While growing a mango tree in a pot requires patience and care, it’s a perfect project for beginners who want to experience the joys of gardening and enjoy the fruits of their labor—literally. This guide will walk you through each step of the process, from selecting the right seed to savoring the taste of homegrown mangos. So, roll up your sleeves, gather your supplies, and let’s dive into the world of mango cultivation!
Step 2: Selecting a Suitable Mango Seed
Before embarking on your mango-growing adventure, it’s crucial to choose a high-quality mango seed to ensure the best chances of success. Here’s how to select the right seed:
- Choose a Variety: Mangos come in various shapes, sizes, and flavors. Opt for a mango variety that is well-suited for container growing, such as “Keitt,” “Tommy Atkins,” or “Honey Gold.” These varieties tend to stay more compact and manageable.
- Select a Ripe Fruit: Pick a ripe mango that you enjoy eating. A ripe mango will have a vibrant color, a pleasant aroma, and a slight give when gently pressed.
- Extract the Seed: Carefully remove the seed from the mango. Clean off any remaining fruit pulp to prevent mold and bacteria growth. Remember, the seed is what you’ll plant to grow your tree.
- Look for a Plump Seed: Choose a seed that is plump, firm, and undamaged. Avoid seeds that are shriveled, discolored, or show signs of decay.
- Consider Multiple Seeds: Since not all mango seeds will sprout successfully, it’s a good idea to choose a couple of seeds to increase your chances of success.
Now that you have your chosen mango seed, let’s move on to the next step: preparing the mango seed for planting.
Step 3: Preparing the Mango Seed for Planting
Preparing the mango seed correctly before planting is essential for giving your future tree a strong start. Follow these steps to get your seed ready for planting:
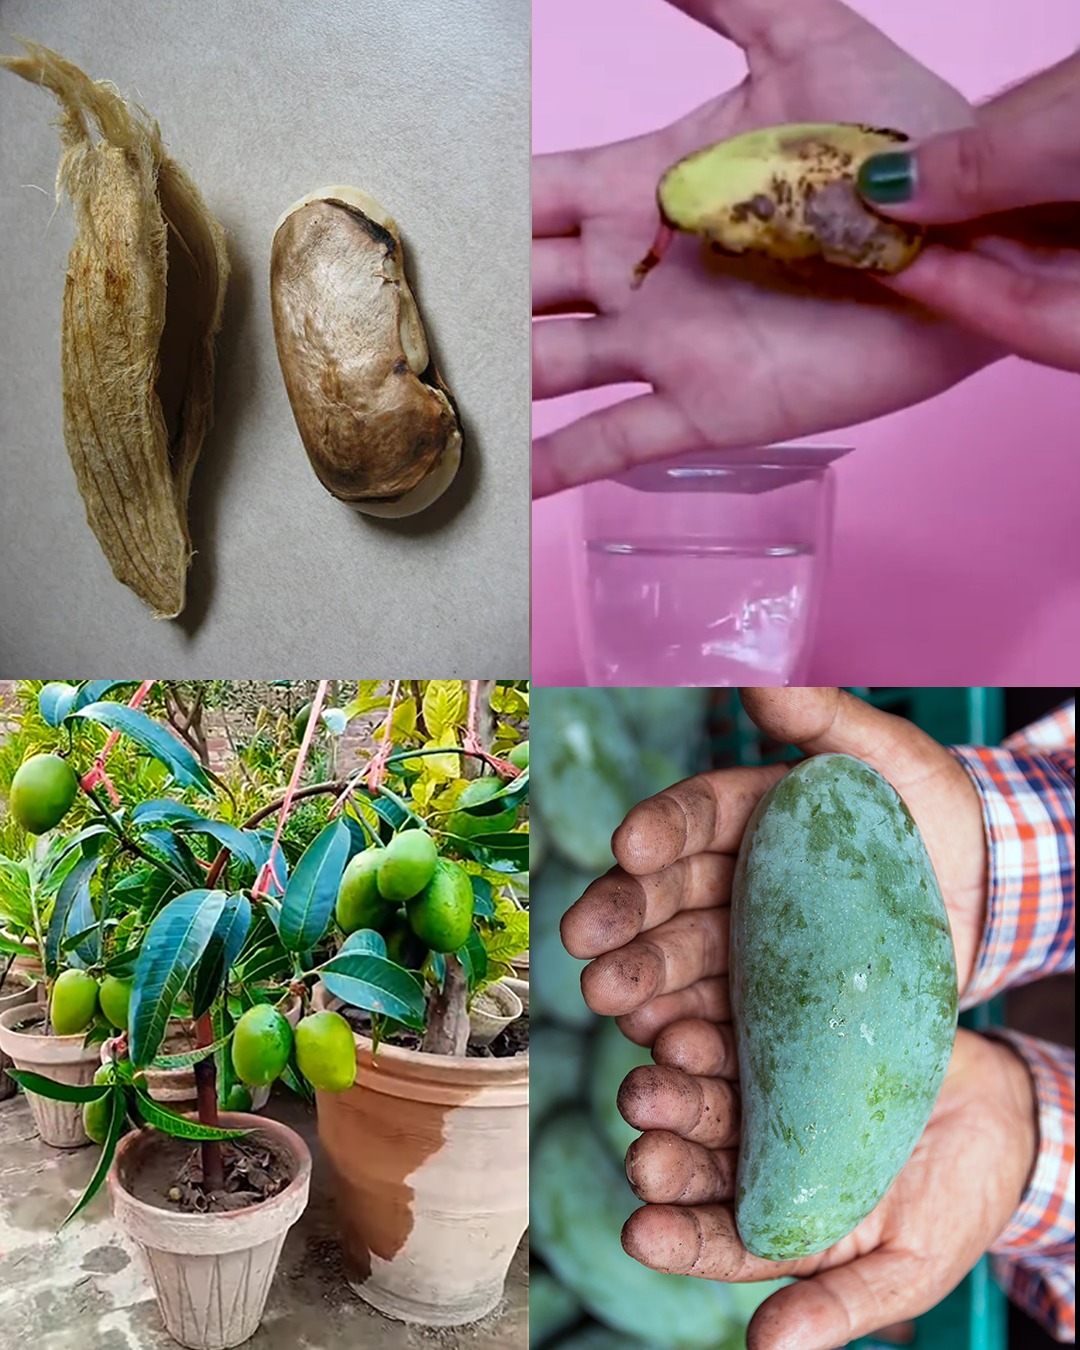
- Remove the Outer Shell: Mango seeds have a tough outer shell. Carefully use a sharp knife to make a small cut through the shell without damaging the inner seed. Gently pry the shell open to reveal the inner seed.
- Remove the Inner Seed: Once the inner seed is exposed, carefully remove it from the outer shell. Be cautious not to damage the seed during this process.
- Inspect for Signs of Damage: Examine the seed for any signs of cracks, splits, or mold. Healthy seeds should be smooth and intact.
- Soak the Seed: Fill a bowl with lukewarm water and place the seed in it. Let it soak for about 24 hours. This soaking process helps to soften the seed coat, making it easier for the seed to germinate.
- Determine the Sprouting End: After soaking, you’ll notice that one end of the seed has a slightly pointed tip, while the other end is flatter. The pointed end is the sprouting end, so take note of this orientation.
By following these steps, you’re preparing your mango seed for optimal germination. Next up, we’ll guide you through choosing the right pot and soil for planting your mango seedling.
Step 4: Choosing the Right Pot and Soil
Selecting the appropriate pot and soil is crucial to provide your mango seedling with the right growing environment. Here’s how to make the right choices:
Choosing the Pot:
- Size Matters: Opt for a pot that is at least 20 inches (50 cm) in diameter and has drainage holes at the bottom. This size will accommodate the growing root system and provide stability for the tree.
- Material: Choose a pot made of durable material, such as plastic or terracotta. Terracotta pots allow better airflow to the roots, but they may dry out more quickly, so keep that in mind.
Selecting the Soil:
- Well-Draining Mix: Use a well-draining potting mix specifically designed for fruit trees or container gardening. Avoid heavy or compacted soils that can lead to poor drainage.
- Add Organic Matter: Mix in some compost or well-rotted organic matter to enhance soil fertility and moisture retention.
Planting the Seed:
- Position the Seed: Place the mango seed in the pot with the pointed end facing down and the flatter end facing up. Plant the seed about an inch (2.5 cm) deep in the soil.
- Water Gently: Water the pot lightly after planting to settle the soil around the seed. Be careful not to overwater, as excessive moisture can lead to rot.
By choosing the right pot size and soil type, you’re setting the stage for a healthy start to your mango tree’s growth. In the next step, we’ll guide you through the process of planting the mango seed and taking the first steps toward cultivating your tree.
Step 5: Planting the Mango Seed
With your prepared mango seed and chosen pot and soil, it’s time to plant the seed and kickstart your mango-growing journey. Follow these steps for successful planting:
- Create a Hole: Using your finger or a small tool, create a hole in the soil that is about an inch (2.5 cm) deep.
- Place the Seed: Gently place the mango seed in the hole with the pointed end facing downward and the flatter end facing upward.
- Cover with Soil: Carefully fill the hole with soil, covering the seed completely. Press the soil down lightly to ensure good soil-to-seed contact.
- Water Gradually: Give the newly planted seed a light watering to moisten the soil. Avoid saturating the soil, as excess moisture can lead to rot.
- Label the Pot: Place a label or marker in the pot with the date of planting and the mango variety. This will help you keep track of your seed’s progress.
- Provide Warmth: Place the pot in a warm and bright location, such as a sunny windowsill. Mango seeds germinate best when kept consistently warm.
- Be Patient: Germination can take several weeks, so be patient. Once the seedling emerges, you’ll see the first leaves, known as cotyledons.
As your mango seedling grows, it will gradually develop true leaves and begin to resemble a small mango tree. In the next step, we’ll explore the crucial aspects of watering and providing proper drainage to ensure your mango tree’s health and growth.
Step 6: Providing Optimal Watering and Drainage
Proper watering and drainage are essential for the health and growth of your mango tree. Follow these guidelines to ensure your tree receives the right amount of moisture:
Watering:
- Check Moisture Levels: Before watering, check the top inch (2.5 cm) of the soil. If it feels dry to the touch, it’s time to water.
- Avoid Overwatering: Mango trees prefer slightly moist soil, but they do not tolerate waterlogged conditions. Overwatering can lead to root rot. Water the plant when the soil is dry, but avoid letting it sit in standing water.
- Watering Frequency: As a general guideline, water your mango tree every 7-10 days, adjusting based on your climate, pot size, and humidity levels.
Drainage:
- Choose a Pot with Drainage Holes: Proper drainage is crucial. Ensure that your pot has drainage holes to prevent excess water from accumulating in the soil.
- Elevate the Pot: Place pot feet or a saucer under the pot to elevate it slightly. This helps water to drain more efficiently and prevents root rot.
- Use Well-Draining Soil: The potting mix you use should be well-draining to prevent waterlogged conditions. Excess water retention can suffocate the roots.
By maintaining a proper balance of watering and drainage, you’ll create an environment where your mango tree can thrive. In the next step, we’ll discuss the importance of sunlight and how to provide the right amount of light for your growing mango tree.
Step 7: Ensuring Adequate Sunlight
Sunlight is a crucial factor in the healthy growth of your mango tree. Follow these steps to provide the right amount of sunlight for your tree:
- Choose a Sunny Location: Place your mango tree in a spot that receives at least 6-8 hours of direct sunlight each day. A south-facing window or a well-lit balcony are excellent options.
- Rotate the Plant: If your tree starts leaning toward the light source, give it a quarter turn every week to ensure even growth.
- Supplemental Lighting: If you’re growing your mango tree indoors and natural light is limited, consider using grow lights to provide the necessary light spectrum for optimal growth.
- Avoid Intense Heat: While mango trees love sunlight, they may suffer in extreme heat. If you’re in a region with scorching temperatures, consider providing some shade during the hottest part of the day.
Adequate sunlight is essential for the mango tree’s photosynthesis and overall vitality. In the next step, we’ll delve into the process of nurturing and pruning your young mango plant to encourage healthy growth and shape.
Step 8: Nurturing and Pruning the Young Mango Plant
Nurturing and pruning your young mango plant will help it develop a strong structure and encourage healthy growth. Here’s how to do it:
Nurturing:
- Fertilization: Feed your mango tree with a balanced, slow-release fertilizer during the growing season (spring and summer). Follow the package instructions for application rates.
- Watering Routine: Maintain a consistent watering routine, ensuring the soil remains slightly moist. Avoid waterlogged conditions.
- Temperature and Humidity: Mango trees thrive in warm and humid conditions. If you’re growing indoors, consider misting the leaves to increase humidity.
Pruning:
- Remove Weak Growth: Regularly inspect your mango tree for weak, damaged, or crowded growth. Gently prune away these parts to encourage strong branching.
- Encourage Airflow: Trim branches that are too dense or growing inwards. Good airflow helps prevent fungal diseases.
- Apical Dominance: Pinch or prune the tip of the main stem after the tree reaches around 20 inches (50 cm) in height. This encourages lateral branching and a bushier shape.
- Prune for Structure: As your tree grows, prune to create a strong central leader (main trunk) and well-spaced lateral branches.
Remember, pruning should be gentle and minimal, especially during the first year. It’s about guiding the plant’s growth, not over-pruning it. In the next step, we’ll discuss when and how to transplant your mango tree to larger pots as it grows.
Step 9: Transplanting to Larger Pots
As your mango tree grows, it will outgrow its initial pot. Transplanting to larger pots allows the roots to continue expanding and promotes healthy growth. Here’s how to transplant your mango tree:
- Timing: Transplant your mango tree when it has outgrown its current pot, usually every 2-3 years or when the roots become crowded.
- Choose a Larger Pot: Select a pot that is 2-4 inches (5-10 cm) larger in diameter than the current one. Ensure it has proper drainage holes.
- Prepare the New Pot: Add a layer of well-draining potting mix at the bottom of the new pot. This helps improve drainage.
- Gently Remove the Tree: Carefully remove the tree from its current pot, being cautious not to damage the roots.
- Inspect the Roots: Gently untangle and trim any circling or overly long roots. This encourages healthy root growth in the new pot.
- Plant in New Pot: Place the mango tree in the center of the new pot and fill around it with fresh potting mix. Ensure the tree is at the same depth it was in the previous pot.
- Water Well: Water the tree thoroughly after transplanting to help settle the soil and provide the tree with the necessary moisture.
- Observe and Adjust: Keep an eye on your mango tree after transplanting. If it shows signs of stress, like wilting, provide some shade and mist the leaves.
Transplanting can be a bit stressful for the plant, so do it carefully and avoid disturbing the roots excessively. With your mango tree in its new pot, you’re one step closer to enjoying your own homegrown mangos. In the next step, we’ll explore potential issues that may arise and how to address them.
Step 10: Recognizing and Addressing Common Issues
Even with the best care, mango trees can encounter some common issues. Being able to identify and address these problems promptly will help your tree thrive. Here’s what to watch out for:
- Pests: Look for signs of pests such as aphids, mealybugs, or spider mites. Use insecticidal soap or neem oil to treat infestations.
- Diseases: Keep an eye out for fungal diseases like powdery mildew or anthracnose. Apply fungicides as needed, and ensure good airflow around the tree.
- Yellowing Leaves: Yellow leaves could indicate nutrient deficiencies. Feed your tree with a balanced fertilizer to address this issue.
- Wilting: Wilting can result from overwatering or underwatering. Adjust your watering routine accordingly.
- Leaf Drop: Stress or sudden changes in environment can cause leaf drop. Maintain consistent care to help your tree adjust.
- Root Bound: If you notice roots circling around the pot, it’s time to transplant to a larger container.
- Lack of Fruit: Mango trees may take several years to bear fruit. Lack of fruit can also be due to insufficient sunlight, improper fertilization, or improper pruning.
- Uneven Growth: Uneven growth can be caused by inadequate light distribution. Rotate the pot periodically to ensure balanced growth.
Regular observation and care will go a long way in preventing and addressing these issues. With patience and diligence, you can help your mango tree overcome challenges and flourish. In the final step, we’ll celebrate the moment you’ve been eagerly waiting for—harvesting your homegrown mangos!
Step 11: Celebrating the Mango Harvest
After months of care and nurturing, the moment you’ve been waiting for has finally arrived—harvesting your homegrown mangos! Here’s how to enjoy the sweet rewards of your efforts:
- Harvest Time: Mangoes typically ripen in the summer months, depending on the variety and climate. They’re ready to harvest when the skin color changes, and the fruit gives a little when gently pressed.
- Harvesting: Use clean, sharp pruning shears to cut the mango from the tree. Leave a short stem attached to the fruit.
- Ripening: Place harvested mangoes at room temperature to allow them to ripen fully. Once ripe, you can store them in the refrigerator for a few days to prolong freshness.
- Enjoy the Fruits of Your Labor: When your mangoes are perfectly ripe, savor the delicious taste of your homegrown produce. Share them with family and friends to spread the joy!
- Save the Seed: Don’t forget to save a seed from one of your harvested mangoes if you’d like to continue the cycle and grow more trees in the future.
The taste of a mango you grew yourself is incredibly satisfying. Take pride in your accomplishment and the delightful flavors that your mango tree has provided. In the final step, we’ll wrap up your journey and conclude your article on growing a mango tree in a pot at home.