
Garlic is a versatile and flavorful herb that is commonly used in cooking around the world. While traditional methods of growing garlic involve planting cloves in soil, an alternative and innovative way to cultivate garlic is by using water and plastic bottles. This method is not only space-efficient but also allows you to observe the growth process up close. In this article, we will provide you with a comprehensive step-by-step guide on how to grow garlic in water using 0.5 plastic bottles.
Materials You’ll Need:
Garlic cloves
0.5-liter plastic bottles (cleaned and sanitized)
Water
A sunny windowsill or a well-lit indoor area
Toothpicks or bamboo skewers
Potting soil (optional)
Liquid fertilizer (optional)
Step 1: Prepare the Garlic Cloves:
Select healthy garlic cloves from a bulb. These cloves should be plump, without any signs of damage or disease. Peel the outer papery skin of each clove, but ensure the inner skin remains intact.
Step 2: Choose and Prepare the Bottles:
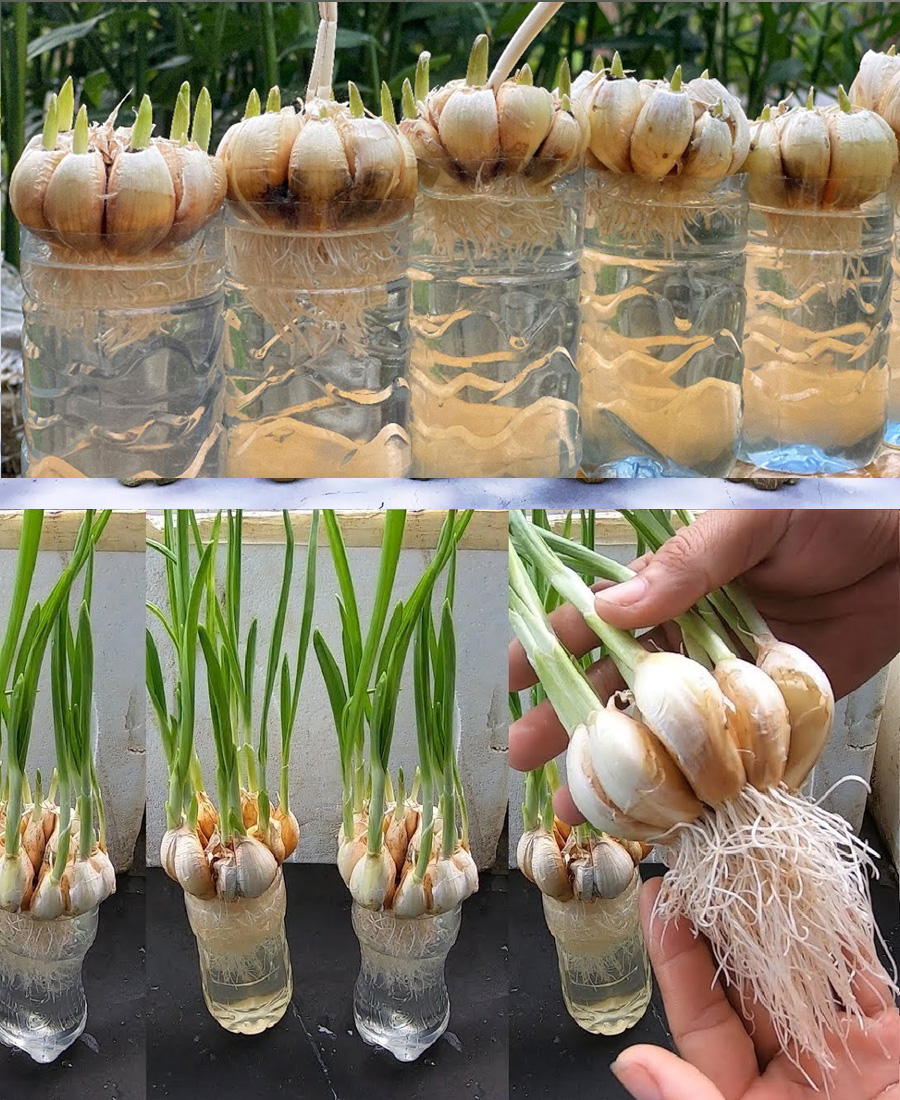
Wash and sanitize the 0.5-liter plastic bottles thoroughly to ensure no harmful residues are present. Cut the top part of each bottle, leaving the bottom portion intact. These will serve as your growing containers.
Step 3: Insert Toothpicks or Skewers:
Using toothpicks or bamboo skewers, insert them around the top of the bottle’s opening. These will provide support for the garlic cloves as they rest on the edge of the bottle, allowing them to grow suspended in water.
recommended by
RAID: SHADOW LEGENDS
Realistic Game For Men Over 40
LEARN MORE
Step 4: Add Water:
Fill the bottom portion of each bottle with water, ensuring that the bottom of the garlic clove is submerged in the water. The water should touch the base of the clove but not cover it entirely.
Step 5: Place Garlic Cloves:
Place one garlic clove in each bottle, resting it on the toothpicks or skewers. Make sure that the bottom of the clove is in contact with the water.
Step 6: Find a Suitable Location:
Place the bottles on a sunny windowsill or in a well-lit indoor area. Garlic requires sunlight to photosynthesize, and a sunny location will promote healthy growth.
Step 7: Monitor and Maintain:
Regularly check the water level in the bottles and ensure that the bottom of the garlic cloves remains in contact with the water. If the water level drops, add more water as needed to maintain the appropriate level.
Step 8: Patience and Growth:
Over the course of a few weeks, you will start to notice the growth of roots from the bottom of the garlic cloves. Shoots will also emerge from the top of the cloves. These shoots will eventually develop into green garlic leaves.
Step 9: Transfer to Soil (Optional):
Once the shoots have grown a few inches tall and the roots are well-developed, you can choose to transfer the garlic cloves to potting soil. Plant them in small pots, burying the cloves just beneath the soil’s surface. Water the soil regularly and provide sunlight to continue the growth process.
Step 10: Harvesting:
Garlic grown in water will not produce bulbs as large as those grown in soil, but you can still harvest the green garlic leaves and use them in your cooking. Simply cut the leaves as needed, leaving the roots intact in the water or soil.
Tips:
Change the water in the bottles every couple of weeks to prevent stagnation and maintain the health of the garlic.
If using liquid fertilizer, dilute it as per the manufacturer’s instructions and add it to the water occasionally to provide nutrients to the growing garlic.
In conclusion, growing garlic in water using 0.5 plastic bottles is a fascinating and educational way to observe the growth of this flavorful herb. While it might not yield full bulbs, you can still enjoy the fresh taste of green garlic leaves in your culinary creations. This method is perfect for those with limited space or those who simply want to experiment with a unique gardening approach.